
For reasons I’m not about to go into, I’ve got some images from a trip 18months ago that still need to be sorted through and processed.
 I’ve got part of the way through this on several occasions over that time, but when I came back to it to have a serious attempt at doing a final “first sort” on the images (weeding out those I really want to process, with the rest going into an “outtakes” folder) to my horror, I found that 2 subfolders of pre-sorted images were missing.
OK, not usually a problem, lightroom (LR) has probably got it’s electrons in a twist if I’ve slightly renamed the folder outside of LR, or moved it into a subfolder (either of which can happen to make backups easier between drives).
Nope, that doesn’t seem to work… OK restore from the backup drive then… Nope, they ain’t there either. Both folders completely AWOL… Oh ****!
Now things start to get scary and I begin to curse myself for not practicing what I preach about a three copy backup (only having two copies of most recent images since they overflowed onto a 3Tb drive – which was starting to get expensive to buy three of at a time… False economy I know – it’s not as expensive as losing images – really ought to sort that…)
When images really are missing from the drive…
So what to do now? And I should say here, this is new territory for me, not having encountered this issue since pre-lightroom days, some 7? years ago?
Well the first obvious thing is to do a OS search (for me Windows) on the filename or date of the images on the entire main and backup drives. Nope, nothing there.
OK next step – I would have had those images on portable drives while travelling. It’s a long while ago, but even older images have survived on now-obsolete portable drives, so worth a try… Nope.
Recovery software
Time to do an internet search for some recovery software.
Before that though, stop doing anything that might write to any drive you think the files were deleted from. That includes exiting LR (especially if it has the auto-write metadata option enabled).
(That’s really important, as deleting files from the computer (whether Windows or Mac) doesn’t remove them from the drive, just the reference to where they are. The file still remains in the same space on the disk until it’s overwritten by another file).
You’ll also need a large spare drive (or lots of space on a seperate drive to the one your images were deleted from).
Which software?
I was willing to pay a reasonable amount for something that did the trick (if it would prove it’s capabilities first), and there are several choices in the paid-for department. First off though it was worth trying some open source (and free) software… and the techradar list was a good starting point.
I tried photorec first – being command line based it’s definitely not for everyone, but it sounded like it was one of the more powerful ones out there. Powerful it may be, but I now realised these images were probably deleted some 4-8 weeks earlier, making the chances of recovery very much slimmer.
It took a while to run but came up with quite a lot of images. And a lot of other files too. All labelled f1684008880 or similar. It was rather time-consuming to weed out the non-image files…
As an aside, something to beware of is that file recovery software can uncover all sorts of files, potentially including previous virus infestations. So if trying to recover non-image files then beware of this!
And I’ll be honest, I’m still wading through the image files it found (although I’m confident none are from the important two folders now.
So I tried the next most useful sounding one on the list – Recuva. (Co-incidentally this one was recommended to me by a friend after the event). It has several advantages over photorec –
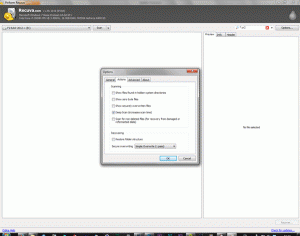 1) for those of you who are terrified of the command line window – it’s got a graphical interface 🙂
2) it has a means of filtering the search to just the file type you’re after (in my case .cr2)
3) it has a deep scan mode – so you can do a quick first pass without this to see what it’s likely to recover, then if that doesn’t recover the files, try the deep scan (that takes much longer but is much more powerful).
4) it’s easier to figure out what can be recovered and just recover the files you want.
5) it also showed files which were partially existing on the drive but were unrecoverable due to overwriting by more recent files (which meant I didn’t need to look for additional software after trying Recuva – it proved that too many of them were gone for good… )
Time and space…
However, beware that it can take a lot of time. For me, all of this (searching 5 drives – 2 of them on a 3TB drive (partitioned to a bit less than 2Tb for that drive) and 3 250-500Gb portable drives) took about 3.5 days, including running overnight… Although that was partly due to issues with not realising how much space was required for the recovered files at the start.
Which brings me neatly to another problem – where to store the recovered files?
Answer: to a totally seperate drive from the one you’re searching on (to avoid accidental overwriting of the files you’re trying to recover).
When searching large drives this can take up to the same amount of space as exists on the whole drive – but less if the recovery software can filter out just the file type or other details of images you’re trying to recover.
How to work out if your files are recovered?
This is easier with some recovery software than others. Recuva 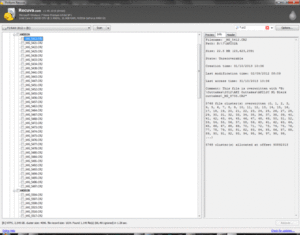 shows details of any images it finds, and lists how good a chance it has of recovery (sadly also including unrecoverable as an option). I suspect that if you’re searching for JPGs instead of RAW files, it displays a thumbnail of them too… – but this doesn’t seem to work for RAW files.
But if the software you’re using doesn’t show you the image thumbails/details, then one easy way to sort through the recovered files to find just the ones you’re after, is to load them into a fresh LR database (again store this on a different drive to the one you’re recoving the images from).
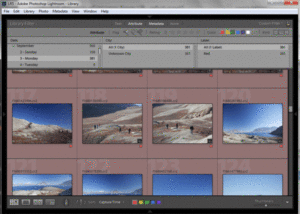 Then using the metadata filter, search for something which will narrow down the particular images easily – in my case I knew they were all taken on Sep 3rd, so did a search for that. Any images found with that date could be put into one folder, the rest into a “worry about if anything there was worth keeping once the main images are found/proved unfindable” folder (or you could delete those if you’re confident that they’re duplicates of others you still have!)
What if it all fails and no images are retrievable?
In my case I got one image back out of 75, fortunately it was one of the four I cared most about (and specifically wanted to use) from those two folders…
Then you’re into “recover what’s available and just be happy you’ve got something back” territory. Sadly, it’s likely most of its professional use will be gone – certainly for stock images…But if it could have a use as a small image, perhaps for a blog or even just as a memory, then it’s still worth doing the next step.
Jeffrey Friedl had a lot of foresight when he created the Preview Cache Image Extraction utility. This searches for the best available preview that LR still has (which could be anything from a gallery placeholder of 160 x 106 pixels, to a final preview at full size – although JPG rather than RAW). On my images, I had a complete mixed batch – 20 were full previews – yay!. Most were 1440×900 standard previews, and a few were just gallery placeholders. But of the three other images I really wanted back two were full previews and one had an alternative that wasn’t as good, but was adequate enough at full size.
Other thoughts once you have some recovered files/JPG previews
I’ve not yet used it (although I have downloaded it and intend to try it out!) but it occurs to me that another of Jeffrey Friedl’s utilities – Photosafe – could be useful in preventing this happening to critical images again… How useful it is in practice time will only tell. But it’s certainly worth a try after something like this – even if it does feel a tad “horse bolted, now lock the stable door…”!
I’m also reinvestigating iMatch again – which I’ve used on and off to fill in some of the gaps in functionality that I’d like LR to have. For now I’m looking at it as a way of de-duping the recovered files safely, without accidentally deleting any recovered ones that are sole copies.